Sikadur® Crack Repair Kit
Sikadur® Crack Repair Kit is a two multicomponent, low viscosity, fast curing, epoxy sealing system for the repair of cracks that occur in solid concrete and solid masonry substrates.
- Convenient easy to use, single tube cartridges that fit standard caulk guns
- Easily mixed when dispensed through flow restrictor (needed for the Sikadur® Injection Resin component only) and static mixers
- Up to three times stronger than existing concrete when cured
- Penetrating and bonding of cracks in concrete when injected (reference: ACI Rap Bulletin 1)
- Excellent for notch and fill, isolated crack repair by gravity feed method using the Sikadur® Injection Resin component (reference: ACI Rap Bulletin 2)
- Early strength developing adhesives for “can’t dry” surfaces (i.e. tolerates dampness with no standing water present)
- Excellent chemical resistance; prevents chloride ion intrusion and further water absorption when cured
- Prolongs life of cracked concrete elements
Usage
Sikadur® Crack Repair Kit may only be used by experienced professionals.- For manual, low pressure injection of horizontal flat and/or vertical static cracksin solid concrete, solid masonry, wood, etc.
- For gravity feed of static cracks (using the Sikadur® Injection Resin component only) in horizontal flat concrete, solid masonry, wood, etc.
- For the sealing of minor, static surface cracks, voids or gaps (using the Sikadur® Capseal component only) in horizontal flat, vertical and/or overhead surfaces in concrete, masonry, wood, etc.
- As a flowable, liquid epoxy grout to fill thin voids below baseplates
Advantages
- Convenient easy to use, single tube cartridges that fit standard caulk guns
- Easily mixed when dispensed through flow restrictor (needed for the Sikadur® Injection Resin component only) and static mixers
- Up to three times stronger than existing concrete when cured
- Penetrating and bonding of cracks in concrete when injected (reference: ACI Rap Bulletin 1)
- Excellent for notch and fill, isolated crack repair by gravity feed method using the Sikadur® Injection Resin component (reference: ACI Rap Bulletin 2)
- Early strength developing adhesives for “can’t dry” surfaces (i.e. tolerates dampness with no standing water present)
- Excellent chemical resistance; prevents chloride ion intrusion and further water absorption when cured
- Prolongs life of cracked concrete elements
Packaging
Kit contents:
- Sikadur® Capseal 300 ml cartridge (2 pcs)
- Sikadur® Injection Resin 250 ml cartridge (2 pcs)
- Sikadur® Capsealr mixer nozzle (2 pcs)
- Sikadur® Capseal applicator fan (2 pcs)
- Cartridge flow restrictor (2 pcs)
- Sikadur® Injection Resin mixer nozzle with extended tube (2 pcs)
- Push fit connector (1 pc)
- Injection ports (16 pcs)
- Pair of gloves (2 pcs)
- Wooden applicator (Spatula) (2 pcs)
Color
| Sikadur® Capseal (Parts A+B mixed) | Concrete grey |
| Sikadur® Injection Resin (Parts A+B mixed) | Transparent / Amber |
Product Details
APPROVALS / STANDARDS
Sikadur® Injection Resin conforms to the current requirements of ASTM C881 / M 235, Types I and II, Grade 1, Class C.*
* except for Gel Time and Slant Shear (Bond) Strength
Shelf Life
18 months from date of production if stored properly in original, unopened and undamaged, sealed packaging.
Storage Conditions
Store in cool, dry, well ventilated conditions, out of direct sunlight at 40 - 75°F (4 - 24 °C).
Density
| Sikadur® Capseal (A+B mixed) | ~1.6 g/cm3 |
| Sikadur® Injection Resin (A+B mixed) | ~1.1 g/cm3 |
Viscosity
| Sikadur® Capseal (A+B mixed) | Non-sag Consistency |
| Sikadur® Injection Resin (A+B mixed) | ~500 cps (0.500 Pa-sec) |
Compressive Strength
Sikadur® Injection Resin
| Time | Temperature | ||
| +40°F (5°C) | +68°F (20°C) | +95°F (35°C) | |
| 4 hours | 500 psi (3.4 MPa) | ||
| 8 hours | 2000 psi (13.7 MPa) | ||
| 16 hours | 2000 psi (13.7 MPa) | 3500 psi (24.1 MPa) | |
| 1 day | 3000 psi (20.7 MPa) | 5000 psi (34.5 MPa) | |
| 3 days | 1500 psi (10.3 MPa) | 8500 psi (58.6 MPa) | 5500 psi (37.9 MPa) |
| 7 days | 6500 psi (44.8 MPa) | 9000 psi (62.1 MPa) | 7000 psi (48.3 MPa) |
| 14 days | 7500 psi (51.7 MPa) | 9500 psi (65.5 MPa) | 7500 psi (57.7 MPa) |
| 28 days | 9000 psi (62.1 MPa) | 10,000 psi (68.9 MPa) | 10,000 psi (68.9 MPa) |
Product cured and tested at temperatures indicated in table. Test specimen size: 1/2" × 1/2" × 1"
Modulus of Elasticity in Compression
| 200,000 psi | (ASTM D 695) |
Tensile Strength
| 6,000 psi | (ASTM D 638) |
Heat deflection temperature
| ~110 ° F (~43 °C) | (ASTM D 648) |
Water Absorption
| 0.24 % | (ASTM D 570) |
Application
Mixing Ratio
| Sikadur® Capseal | Part A : Part B = 10:1 |
| Sikadur® Injection Resin | Part A : Part B = 1:1 |
Layer Thickness
| Sikadur® Capseal | 5/16" (8 mm) |
| Sikadur® Injection Resin | 1/32" - 1/4" (0.1–6 mm) |
Sag Flow
| Sikadur® Capseal (A+B mixed) | Non-sag, including overhead |
| Sikadur® Injection Resin (A+B mixed) | Liquid |
Product Temperature
Condition cartridges to 65 - 75 °F (18 - 24 °C) before set-up and mixing / dispensing.
Ambient Air Temperature
40 °F (4 °C) minimum / 95 °F (35 °C) maximum
Dew Point
Beware of surface condensation! To avoid dew point conditions during application, substrate temperature must be at least 5 °F (3 °C) above measured dew point temperature.
Substrate Temperature
40 °F (4 °C) minimum / 95 °F (35 °C) maximum
Cure Time
Sikadur® Capseal
| Temperature | Open time - Tgel | Curing time - Tcur (Injection Time) |
| +86 °F (30 °C) | 4 minutes | 30 minutes |
| +77 °F (25 °C) | 5 minutes | 40 minutes |
| +68 °F (20 °C) | 6 minutes | 50 minutes |
| +50 °F (10 °C) | 10 minutes | 85 minutes |
| +41 °F (5 °C) | 18 minutes | 145 minutes |
Sikadur® Injection Resin
| Temperature | Open time - Tgel | Peel-off time (Capseal removal) | Curing time - Tcur |
| +86 °F (30 °C) | 20 minutes | 3 hours | 12 hours |
| +68 °F (20 °C) | 30 minutes | 6 hours | 24 hours |
| +41 °F (5 °C) | 2 hours | 18 hours | 72 hours |
Watch our Sikadur Crack Repair Kit in Action!
Coverage
Sikadur® Capseal: Placed at 1 inch (25 mm) wide x 1/8 inch (3 mm) thick yields approximately 10 linear feet (3 linear meters) per cartridge*
Sikadur® Injection Resin: Injected or gravity fed into a 1/8 inch (3 mm) wide (3 mm) wide x 1 inch (25 mm) deep crack yields approximately 10 linear feet (3 linear meters) per cartridge*
(1) Sikadur® Crack Repair Kit kit typically repairs approximately 15 to 20 linear feet (4.5 to 6.0 linear meters) of cracked concrete.*
* Estimates based on theoretical calculation. Actual field coverage rates may vary based on actual concrete conditions.
APPLICATION INSTRUCTIONS
General:
- Surfaces must be clean, sound, dust-free and as dry as possible. Surfaces may be damp, but freeof standing water and frost.
- Remove dust, laitance, grease, oil, tar, curing compounds, impregnations, waxes, loosely adhering bond inhibiting foreign particles, disintegrated materials and all other contaminants.
- If a wet method of substrate preparation is considered, allow surfaces to thoroughly dry for a minimum 24 to 48 hours.
- Mask off and protect any adjacent surfaces that should not receive contact with Sikadur® Capseal or Sikadur® Injection Resin.
Solid Concrete, Solid Masonry:
Pressure Injection of static (i.e. nonmoving) cracks
- Cracked substrate must be solid and not allow Sikadur® Injection Resin to pass through its thicknessand/or escape when injected.
- Mechanically prepare (i.e. roughen; profile to a minimum ICRI CSP-2 to CSP-3) surfaces using a wire brush, abrasive grinder or similar.
- Remove dust, standing water and obstructions visible within the crack void using brushes, a wet/dry vacuum and/or oil free compressed air.
- After injection ports are mounted and cap seal gel adhesive is sufficiently cured, use oil free compressed air to force any standing water that may be present out of the crack void. Start at injection port locatedat the highest elevation to force standing water downward and out of lower injection ports.
Gravity Feed of static (i.e. nonmoving) cracks
- Cracked substrate must be solid and not allow Sikadur® Injection Resin to pass through its thicknessand/or escape when gravity fed.
- Notch cracks open to approximately 1/8 inch (3 mm) wide by 1/8 inch (3 mm) deep minimum. Do not exceed 1/4 inch (6 mm) wide by 1/4 inch (6 mm) deep maximum.
- Remove dust, standing water and obstructions visible within the crack void using brushes,a wet/dry vacuum and/or oil free compressed air.
SUBSTRATE QUALITY
- Minimum age of concrete must be 21–28 days, depending on curing and drying conditions.
- Substrate surfaces along the line of the crack required for the Sikadur® Capseal, must be sound, clean and dry. Free from standing water, ice, dirt, oil, grease, coatings, laitance, efflorescence, old surface treatments, all loose particles and any other surface contaminants that could affect adhesion of the injection ports.
- Cracks must be clean. Horizontal cracks, which are filled by the 'gravity feed' technique, should be v-notched along the entire crack length with grinding equipment.
MIXING
Preparing the Sikadur® Capseal Cartridge
|
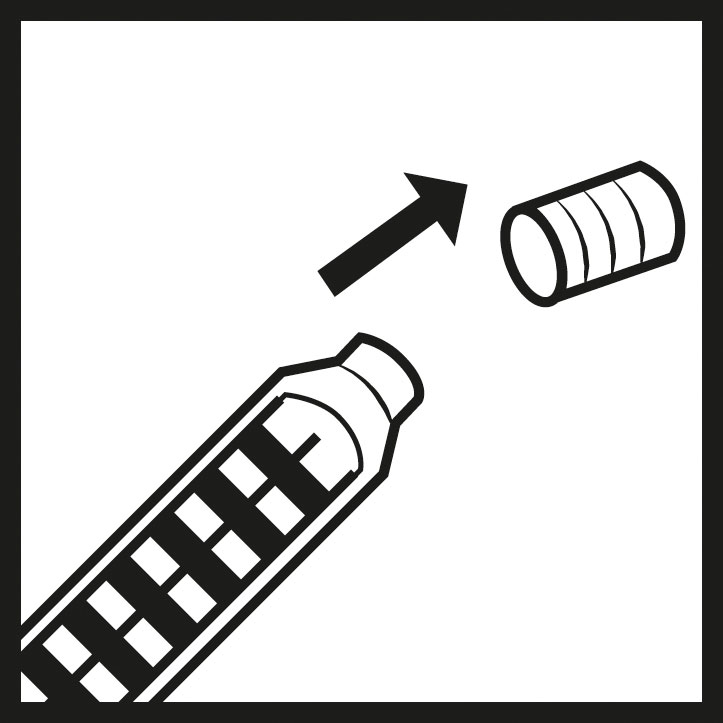
| 1. Unscrew and remove the cap |
|
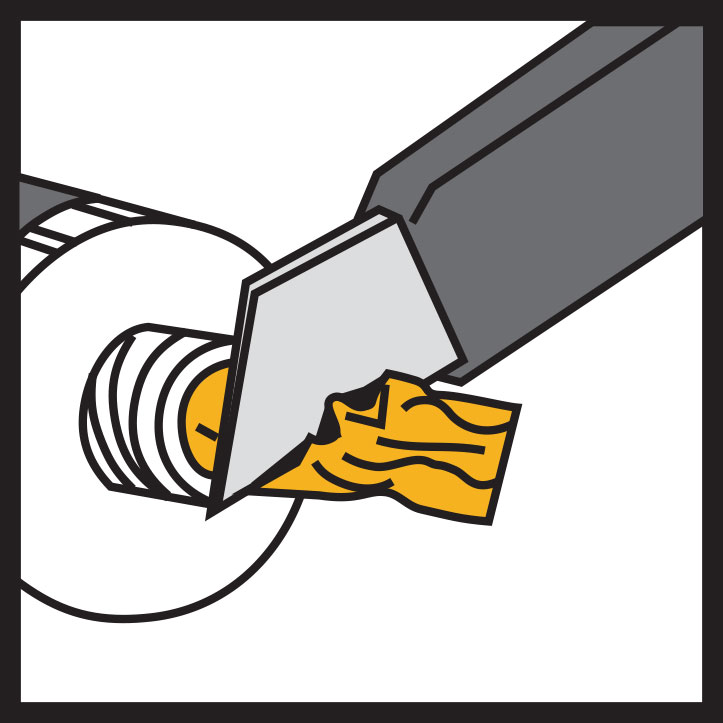
| 2. Cut the end off the protective film |
|
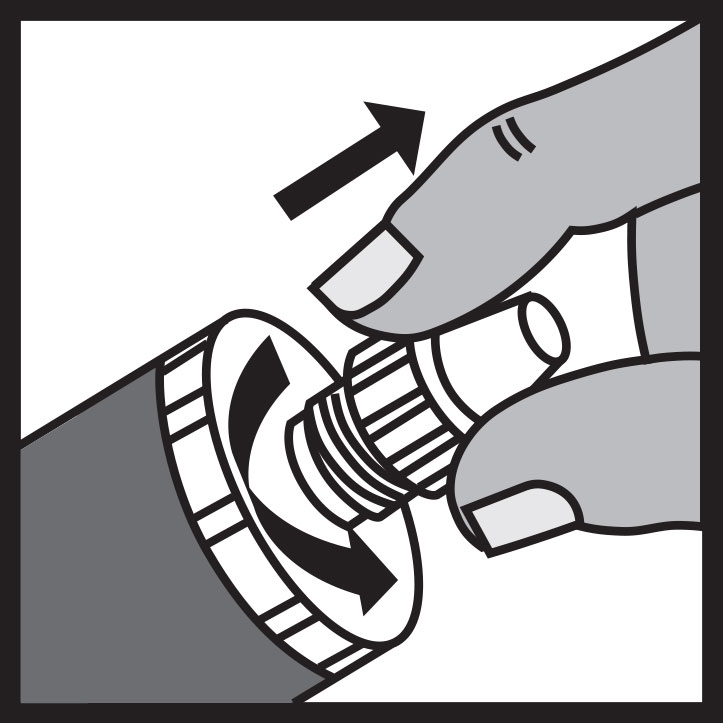
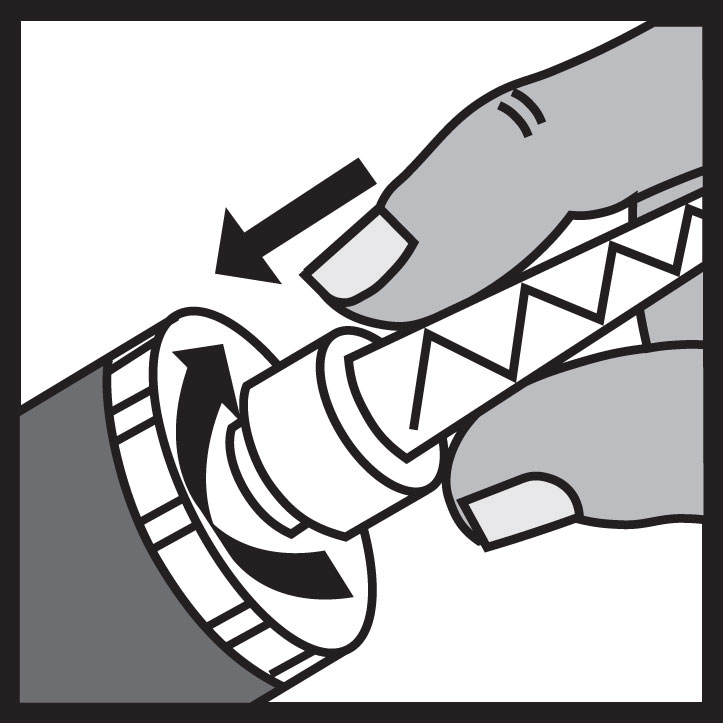
| 3. Screw on the square mixing nozzle |
|
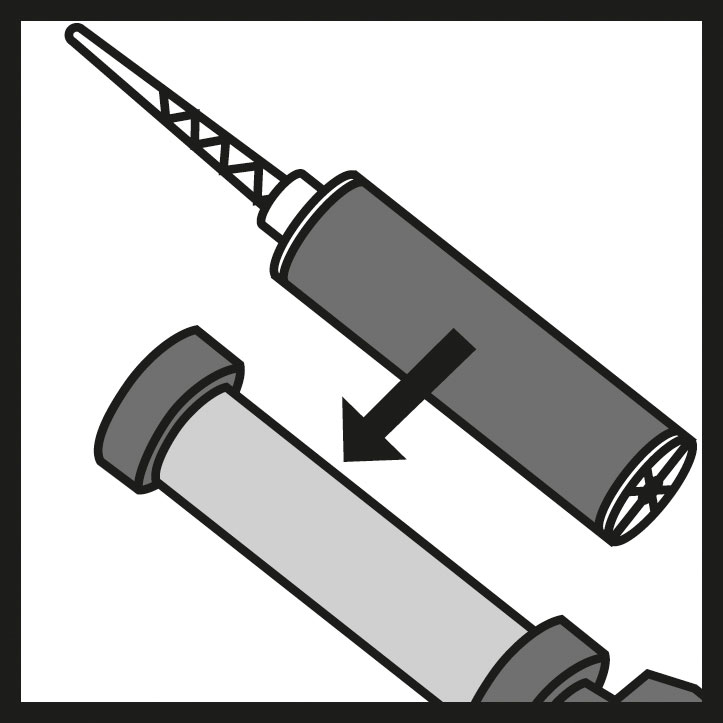
| 4. Place the cartridge into the application gun ready for use. Pump gun until both resin parts are extruded as one mixed consistent colour. Do not use unmixed material. |
|
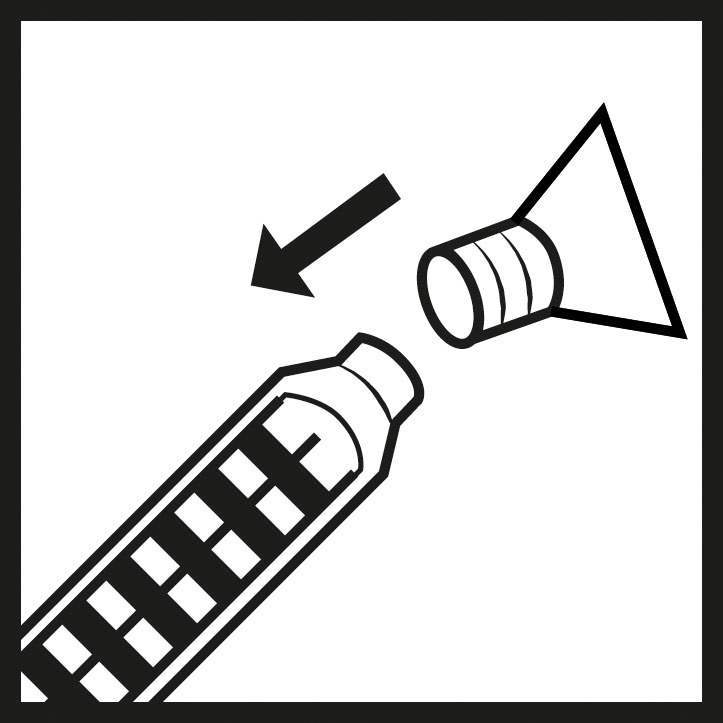
| 5. After bonding on the injection ports, remove the tip from the static mixing nozzle |
|
| 6. Fit the applicator fan onto the square mixing nozzle then start the crack sealing application. |
Note: When the work is interrupted, the square mixing nozzle can remain on the cartridge after the gun pressure has been released. If the resin has hardened in the nozzle when work is resumed, a new square mixing nozzle must be attached.
Preparing the Sikadur® Injection Resin cartridge
|
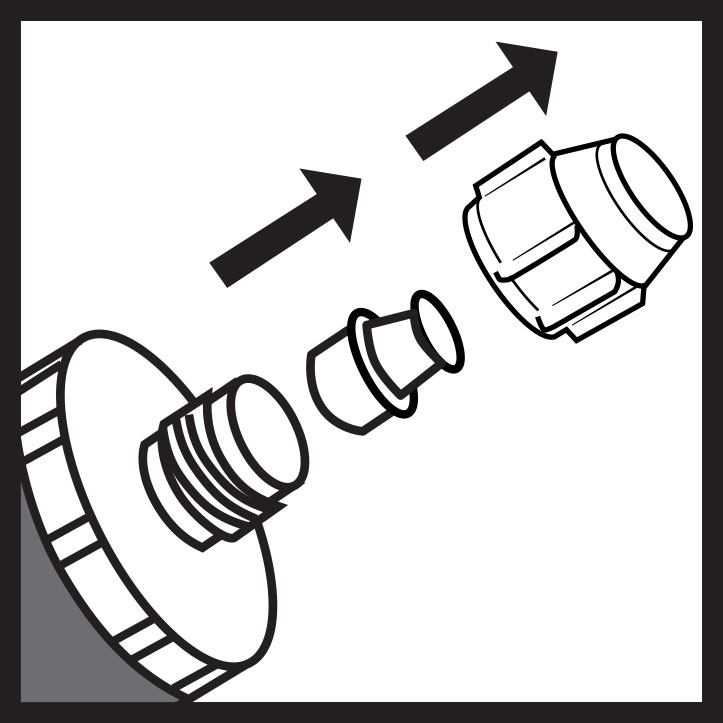
| 1. Unscrew the screwcap (do not throw away) and remove the plug from the cartridge outlet |
|
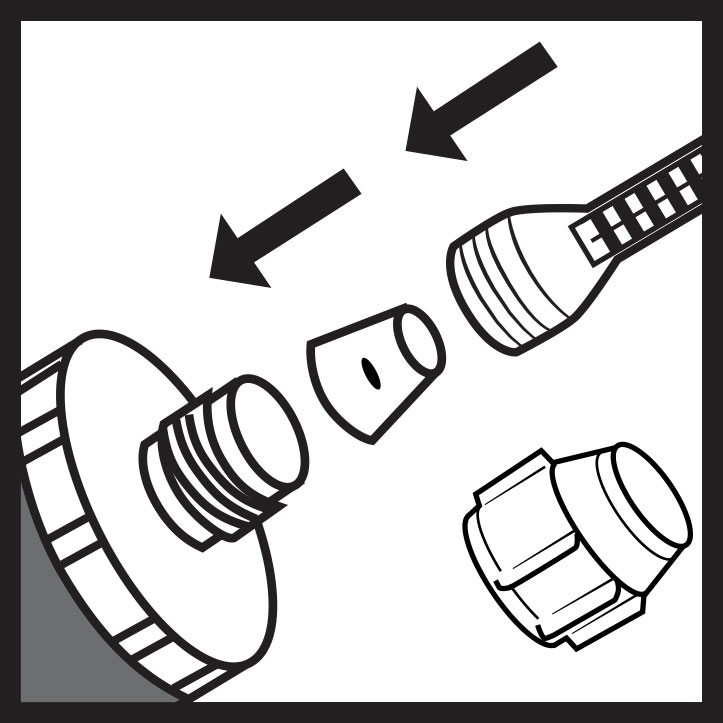
| 2. Fit the cartridge outlet plug into the cartridge then place injection resin mixer nozzle onto the cartridge |
|
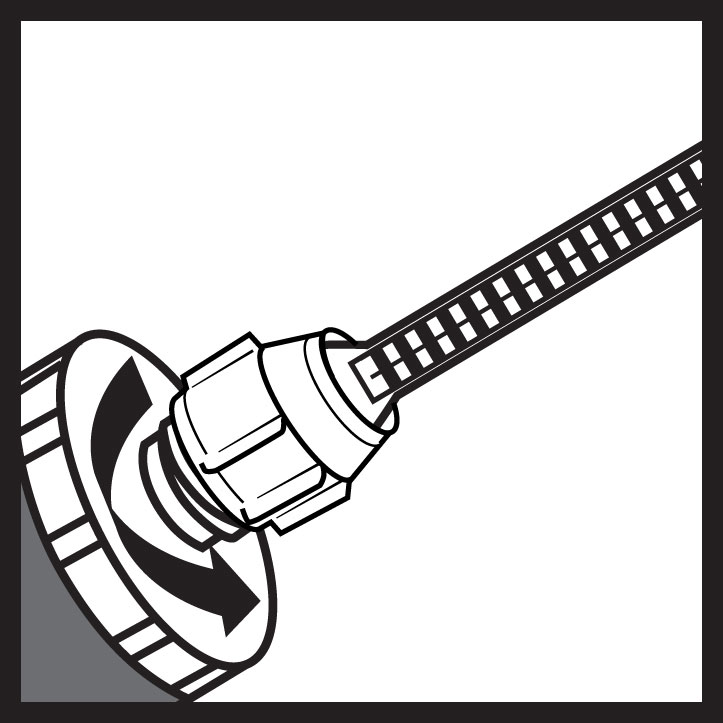
| 3. Slide the screwcap over the injection resin mixer nozzle and screw onto the cartridge |
|
| 4. Place the Sikadur® Injection Resin cartridge into the application gun ready for use |
|
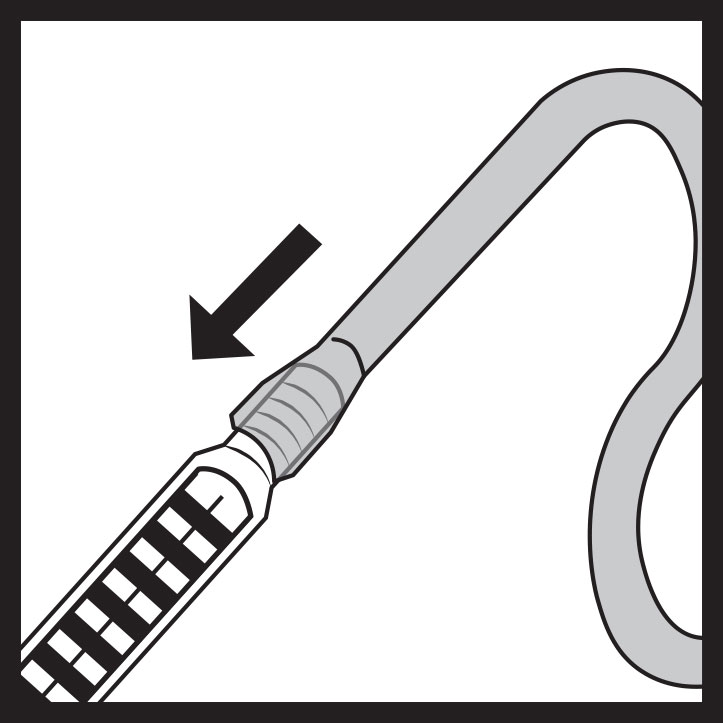
| 5. Fit the flexible extension hose onto the injection resin mixer nozzle |
|
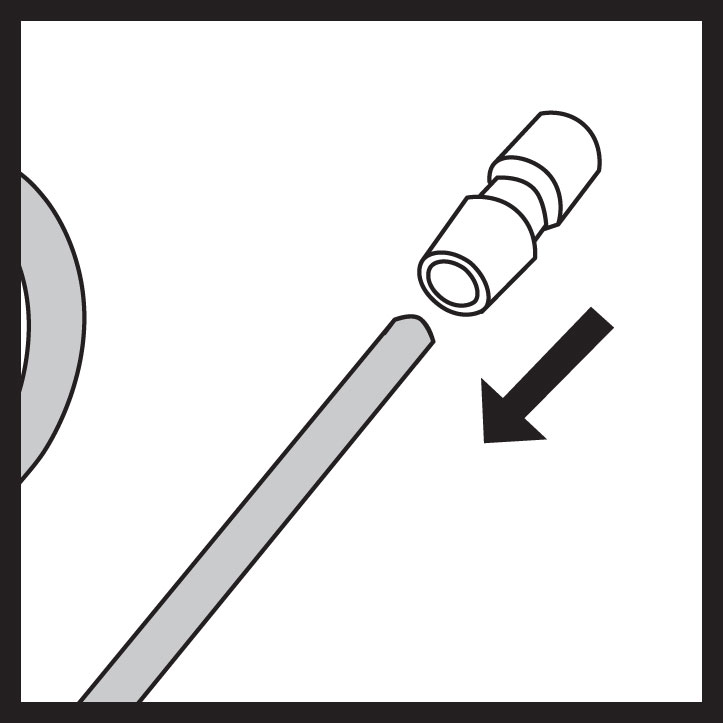
| 6. Fit push fit connector onto the hose. Pump gun until both resin parts are extruded as one mixed consistent colour. Do not use unmixed material. Place connector over an injection port and start the injection application. |

